Set up a new comp – HDTV 1080p 25 FPS, make sure you have square pixels – for this one, take the duration down to 10 seconds and 0 frames. 0;00;10;00 You can always go into the settings and change this if you’ve already made your composition.
We normally bring video files of Illustrator files into After Effects, but this time, we’re doing everything from scratch. Make sure your background colour is something light and you will be able to see what you’re doing a little more. If you want to make sure everything is lined up perfectly, go to View > Show Rulers and View > Show grids. You can change the way your grid looks in Edit > Preferences > Grids & Guides if you want to, just like all the other Adobe applications.
Use the rectangle tool to draw a rectangle, and choose any colour fill and no stroke for your shape. Looking at the timeline window, we get various options for it like path, stroke, and fill. You can change the roundness, position, and the size, but we want a normal rectangle. Turn your rectangle into a bezier path, Right Click on “Rectangle” on your shape layer drop down in the timeline window and click Conver to Bezier Path. This makes our shape a path which means we can grab the pen tool and add and take away anchor points to make the shape a little more interesting.
Move it to where you want it to appear on the screen (I chose bottom left corner) and duplicate the shape using CRTL+D / CMD+D. Now, on duplicate layer change the colour and move underneath the other shape in the layers window. The reason for duplicating the layer is simply for timesaving reasons, and we want the angles to match up.
Add two text layers for the name on top shape, and the blurb on bottom shape. The nice thing about doing it this way is that it turns them into paths so we can manipulate them easily and everything is happy. (her words)
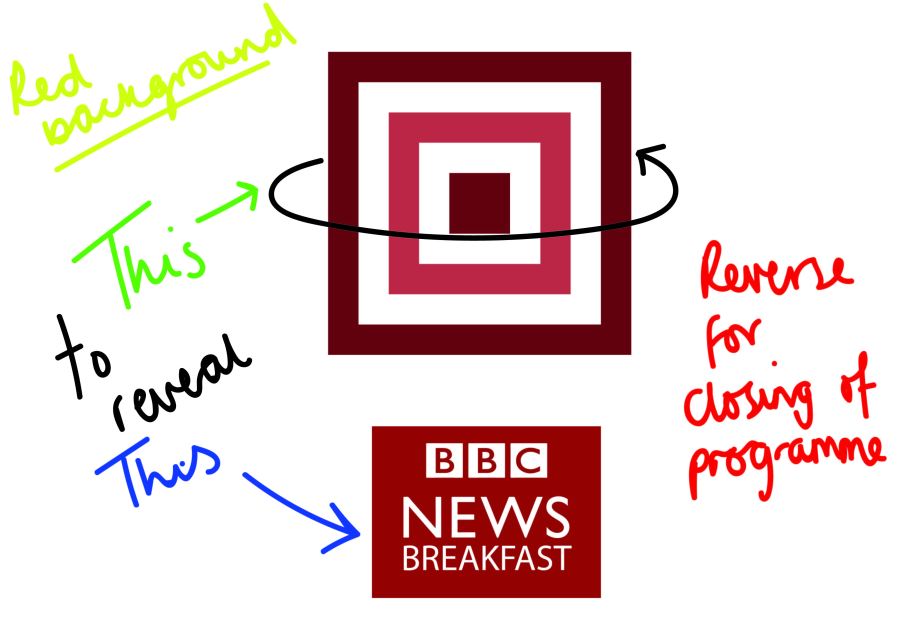
This is just a static image at the moment. They will animate in from one side and reveal itself. If we select one of the shapes, the anchor point is way away from the shape which is no good to us, so we need to shift it with the pan behind tool which is the square with four arrows icon. The keyboard shortcut is Y. That way we can grab it and shift it onto the centre, left anchor point. Now if we want to scale it, it scales it from that point and that point only. Now we’re going to start animating it. But we’re not going to start it moving or appearing immediately. Give it a second before you start making it appear on-screen.
We should have two shape layers and two text layers. We’re just going to use the scale tool to animate them, select shape layer 2 and press S, it will just bring up scale tool rather than all of the other options and on the timeline, move the playhead along to 1 second. At the moment, if we change the scale the whole thing scales up and down which isn’t want we want. Unlink it with the chain icon next to scale options for the X & Y axis, then we can set initial scale to 0 and move it along a little bit and set the scale to 100 so that the shapes come all the way in and are revealed.
Now, on shape layer 2, select both of your scale keyframes, and on the other shape layer, move the playhead so that it is slightly earlier than the other scale properties and press CTRL+C and CTRL+V / CMD+C and CMD+V and it will put in those 2 keyframes and their values on the other shape layer.
You can add easing onto your shapes if you really want to, ease to your hearts content.
The graphics slide in but the text isn’t animating, so we’re going to use track matting to reveal them because it will make it appear nicely.
We currently have a range of text layers and shape layers, now we are going to make duplicates of both of our shape layers. Select a layer and press CTRL+D / CMD+D to duplicate it, and what we’re going to do is set it up that the duplicate shape is underneath the text layer that the shape is on. So:
Text layer for the name
Duplicate shape for the top shape
Text later for the blurb
Duplicate shape for the bottom shape
Original shape for the top shape
Original shape for the bottom shape
Under the Track Matte settings, set the text layers to alpha and set the fill colour to the colour that you want your text to be. Because we duplicated the layers, we have the scale settings from the other shape. Select the keyframes for the duplicate layers and shift them along a little later so the shape comes on first, and then the other shapes come in which reveal the text.
You have your lower third!
You can duplicate your original shapes, which we can then shift over slightly to create a two-tone shape with the same shape and the same motion. This just gives it a little more depth, and you can move the shapes along with the position settings. Because we have it all as one setting, if we want it to animate in and then out, we can pre-compose it. Select all of your layers, and right click and select pre-compose. This will move everything into a new composition. Now, shrink the precomp down to half of the time of your workspace (5 seconds), duplicate it and shift it to the other half of your workspace and right click it. Now, click time reverse layer and you have a lower third that reveals and disappears.
You can add time remapping by right clicking and enabling time remapping. You could also press CTRL+ALT+T – I don’t know what the mac shortcut is though.
Once you have turned on time remapping, we have a keyframe at the start and the end of the workspace. If we move the end frame to the middle of the composition, it will speed up the first section where it would come onto the screen.
Add to render queue, we don’t want the white to be there, if we are giving this as actual footage, they could key out the white but it’s just hassle and gives someone else something to do. Under settings, the video output channel needs to be RGB + alpha. If you output it as this, we keep the transparency which means you can put it on top of anything.